

How To Replace Water Inlet Valve On Ge Washing Machine
If your GE washing machine won't start and you don't know what to practise, you've come to the right place. This detailed guide will explicate the causes of this problem and show y'all how to fix it. So, without further ado, let's brainstorm…
GE Washing Automobile Starts To Fill And so Stops — Solution
If your GE washing machine starts to make full then stops, cheque for the following faults…
1. H2o Pressure Switch Has Failed
The water pressure level switch monitors the level of h2o in the washing machine and tells the washer when to close off the water supply. If this part is damaged, your washer could overfill, or in this instance, not fill up. Here's how to replace this part…
Replacing A GE Front Loader Washing Auto H2o Pressure Switch
Do the post-obit to supercede the water pressure level switch on your GE top loader washing machine…
Step ane. Avert h2o leakage and electrocution by turning off your washing machine'south h2o and power supply before attempting any repairs.
Step 2. Apply your screwdriver to take out the screws at the dorsum of your washing machine belongings the elevation console.
Footstep three. Slide the panel back a few inches and lift information technology off your washing machine.
Step 4. The water force per unit area switch is mounted on the left side of the cabinet frame. Disconnect the two electrical connectors attached to the switch.
Step 5. Plow the water pressure level switch slightly and detach it from the washing machine's cabinet.
Step 6. Press the clench on the hose connected to the water pressure switch and slide it out of place.
Pace 7. Disconnect the hose from the water pressure switch and take the switch out of your washing machine.
Step 8. Become your new water pressure switch out of its pack and connect it to the hose.
Stride nine. Secure the hose to the h2o pressure switch by sliding the retaining clench in place.
Step x. Snap the new water pressure switch in place on the washing automobile'southward cabinet.
Footstep 11. Connect the ii electrical connectors to their advisable terminals on the new water pressure switch.
Step 12. Slide the top console of your washing automobile back on and secure it by applying the screws at the dorsum.
Pace 13. Turn on your washing machine's water and power supply then make certain everything is working properly by running a wash wheel.

Prices pulled from the Amazon Production Advertizement API on:
Production prices and availability are accurate as of the appointment/fourth dimension indicated and are subject to change. Whatsoever price and availability data displayed on [relevant Amazon Site(south), as applicable] at the fourth dimension of purchase will utilize to the purchase of this product.
Replacing A GE Meridian Loader Washing Automobile Water Pressure level Switch
Practice the following to replace the water pressure pressure switch on your GE top loader washing machine…
Stride 1. Do not attempt any repairs on your GE washing machine without turning off the water and power supply first.
Step 2. Disconnect the water inlet hoses from the ports at the dorsum of your washing machine.
Step iii. Use your screwdriver to take out the screws at the dorsum of the control panel and disconnect wires connected to information technology.
Step four. Wedge a putty knife under the primary superlative panel of your washing motorcar to release the clips holding the main front panel of your washing machine.
Stride 5. Detach the panel from the washing machine and ready it bated.
Pace 6. Remove the two screws holding the master top panel of your washing car with a Philips screwdriver
Step vii. Pull the main top panel frontwards slightly and elevator it upwards.
Pace 8. Use a pair of pliers to squeeze and release the wire retainer from the frame.
Step 9. Open up the chapeau of your washing machine and squeeze the tab on the lid switch to release it.
Step 10. Turn the lid switch sideways and push information technology through the opening.
Step 11. Elevator the chief top panel off the washing machine and fix information technology aside.
Step 12. Apply your screwdriver to have out the screws belongings the command panel subclass, rear panel, and trim.
Step xiii. Use a pair of pliers to detach the tube continued height the water pressure switch.
Stride xiv. Use a pair of pliers to squeeze the water pressure switch tab nether the control console subclass to release the switch.
Step fifteen. Disconnect the electrical connectors from the water pressure switch.
Step 16. Get your new water pressure switch out of its pack.
Step 17. Snap the new water pressure level switch into the control panel bracket.
Step 18. Connect the wires to the new h2o pressure level switch.
Step 19. Connect the air force per unit area tube to the new water pressure switch.
Step xx. Put the control panel trim back in identify and apply the screws to secure.
Step 21. Secure the rear panel to the trim past applying the screws.
Stride 22. Use the screws on the control panel bracket.
Stride 23. Insert the chapeau switch through the hole in the main top panel and snap it back in place.
Step 24. Snap the lid switch wire retainer into the frame.
Pace 25. Slide the main top panel back in place and apply the screws at the front to secure information technology.
Stride 26. Snap the main forepart console of your washing auto dorsum in identify.
Pace 27. Reconnect the wire connectors to the control panel and snap the panel dorsum in place. Apply the screws at the back to secure it.
Step 28. Connect the water inlet hoses dorsum to the ports at the back of your washing machine.
Stride 29. Turn on your washing machine's h2o and power supply and then make sure everything works properly past running a launder cycle
2. Water Inlet Valve Has Failed
Hither's how to supervene upon the h2o inlet valve in your GE washing motorcar…
Replacing H2o Inlet Valve GE Top Loader Washing Motorcar
Do the following to supercede the water inlet valve on your GE top loader washing car…
Step 1. Turn off your washing machine's water and ability supply earlier attempting any repairs in order to avert electrocution or water impairment.
Pace 2. Detach the water inlet hoses from the ports at the back of your washing machine (go on a rag nearby in case water spills).
Step 3. Take out the screws at the back of the command console.
Pace four. Slide the control panel sideways and disassemble it from your washing automobile.
Pace v. The water inlet valve volition be mounted on the control panel subclass. Disconnect the solenoid wire connectors from the valve.
Pace vi. Use a pair of pliers to press the clamp on the hose continued to the water inlet valve and slide it out of place.
Step 7. Use your screwdriver to take out the mounting screws holding the water inlet valve assembly to your washing car.
Step 8. Pull the h2o inlet valve associates out of your washing auto.
Step 9. Get your new h2o inlet valve associates out of its pack.
Step 10. Install the new water inlet valve assembly in your washing machine and secure it by applying the iii mounting screws.
Pace 11. Connect the hose to the new water inlet valve and secure information technology by sliding the retaining clench in place.
Step 12. Connect the each solenoid wire connector to its appropriate concluding on the new h2o inlet valve associates.
Step 13. Put the control panel back on and secure it by applying the screws at the back.
Step 14. Reconnect the water inlet hoses to the inlet ports at the back of your washing machine.
Stride 15. Plug in your washing automobile's ability cord and turn on the water supply so try running a wash cycle to brand sure everything is working properly.
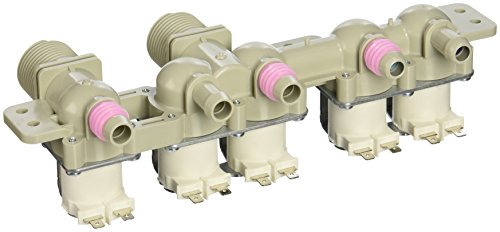
GE WH13X10017 Genuine OEM H2o Inlet Valve for GE Washing Machines
- The GE Appliances WH13X10017 Water Inlet Valve is a genuine OEM (Original Equipment Manufacturer) part designed and engineered to exact specifications
- Replacement GE Appliances Washing Machine Water Inlet Valve controls the water period into the washer
- GE Appliances WH13X10017 Washing Automobile Water Inlet Valve is likewise called the H2o Inlet Valve Assembly
- Loftier quality GE Appliances OEM WH13X10017 Washing Machine Water Inlet Valve is manufactured with premium materials for immovability and exact fit, be sure to follow instructions in owners transmission when installing this part
- Repair your appliance with conviction when y'all choose Genuine GE Appliances Parts & Accessor
Prices pulled from the Amazon Product Advertizing API on:
Product prices and availability are accurate as of the date/time indicated and are subject to change. Any cost and availability information displayed on [relevant Amazon Site(south), as applicable] at the time of purchase will employ to the buy of this product.
Check out these other articles…
GE Washing Machine Door [Issues & Solutions]
GE Washing Machine Sounds Like… [How To Fix]
GE Washing Machine Non Working [Quick Fix]
How To Install GE Washing Auto… [Detailed Guide]
GE Washing Machine Turning On/Off [Issues Solved]
GE Washing Machine Rinse [Problems & Solutions]
GE Washing Machine Cycle [Guide, Issues & Solutions]
Replacing Water Inlet Valve In GE Forepart Loader Washing Motorcar
To replace the water inlet valve in your GE front loader washing machine, hither's what yous'll need to do…
Step 1. Ensure that your washing motorcar'due south h2o and power supply is properly turned off in order to avoid water leakage and electrocution.
Step 2. Go to the dorsum of your washing car and disconnect the water inlet hoses (be prepared for some h2o to leak out).
Stride 3. Utilise a Philips screwdriver to take out the screws at the back of your washing machine belongings the top panel.
Step 4. Slide the height panel dorsum a few inches and lift information technology off your washing machine.
Pace 5. Disconnect the solenoid wires connected to the water inlet valve inside the washing auto'southward chiffonier (ensure that y'all take note of the positioning of each wire).
Pace 6. Use a pair of pliers to press the clench property the hose to the water inlet valve and slide it out of identify.
Pace 7. Disconnect the hose from the water inlet valve assembly.
Stride 7. Remove the two mounting screws at the dorsum of your washing machine holding the water inlet valve using a Philips screwdriver.
Pace 8. Pull the h2o inlet valve assembly out of the washing machine.
Step ix. Become your new water inlet valve associates out of its pack.
Step 10. Install the new water inlet valve assembly in your washing machine and secure it by applying the two Philips screws at the dorsum of the washing machine.
Footstep 11. Connect the hose to the new water inlet valve assembly and slide the retaining clamp in place to secure information technology.
Step 12. Connect each solenoid wire connector to its advisable terminal on the new water inlet valve assembly.
Step 13. Connect the water inlet hoses to their appropriate ports on the new water inlet valve associates (to avert water leakage, make sure that the connection is properly secured).
Pace 14. Slide the top panel of your washing machine dorsum on and apply the Philips screws at the back to secure it.
Step 15. Turn on your washing machine'southward water and ability supply so ensure that everything works properly by trying to run a wash bicycle.
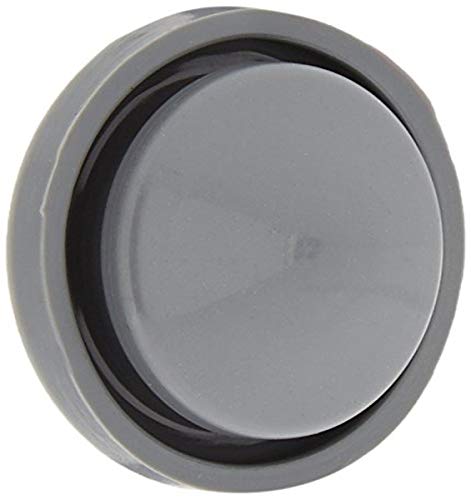
How To Replace The Start Button In A GE Washing Machine
Step one. Avoid water leakage and electrocution by ensuring that y'all turn off your washing machine's water and ability supply before attempting any repairs.
Step 2. Run some garden wire or fishing line around each of the control knobs and pull them off your washing machine.
Footstep 3. Use your screwdriver to accept out the screws at the dorsum of your washing car's control panel.
Step four. Slide the command panel sideways a flake and detach information technology from the master control housing. Lay the panel flat on the washer'southward chief acme.
Step five. Apply a 5/16 inch nut-driver to take out the screws holding the control board to the panel.
Pace vi. Elevator the control board out of the panel and set it aside.
Step 7. Pull the former Start button from the inside of the control panel to take it out.
Footstep 8. Get your new Start button out of its packaging and push button it through the opening in the control console.
Step 9. Put the control board back in place inside the console and secure it by applying the nuts.
Stride 10. Snap the control console assembly dorsum in place and apply the screws at the back to secure it.
Pace eleven. Snap all the control knobs dorsum in place on the control console.
Step 12. Plow on your washing machine's h2o and power supply then ensure that everything is working properly by running a launder bicycle.
Prices pulled from the Amazon Production Advertising API on:
Product prices and availability are accurate as of the date/time indicated and are discipline to change. Any price and availability information displayed on [relevant Amazon Site(s), equally applicative] at the fourth dimension of purchase will apply to the purchase of this product.
How To Replace The Beginning Capacitor In Your GE Washing Machine
Do the following to replace the starting time capacitor in your GE washing machine…
Footstep 1. Never attempt whatever repairs on your washing car without turning off the water and ability supply offset. This helps preclude h2o leakage and electrocution.
Step two. Insert a putty knife under the principal pinnacle panel of your washing machine to release the clips holding the forepart panel of your washing car.
Pace three. Detach the master front panel from your washing car and set it aside.
Footstep iv. The start capacitor is mounted on the side of the washer's cabinet. Disconnect the ii electrical connectors from the capacitor.
Step 5. Cut the zip ties holding the capacitor to the chiffonier frame and set the capacitor aside.
Step 6. Go your new start capacitor out of its pack.
Step 7. Mount the new start capacitor on the cabinet frame and secure by passing cipher ties through the two holes on the cabinet.
Stride 8. Record the capacitor wires to the new start capacitor and connect the electrical connectors to the capacitor.
Step 9. Snap your washing auto's main front console back in place.
Step ten. Plough on the ability and water supply of your washing machine then make sure everything is working properly by trying to run a wash bike.
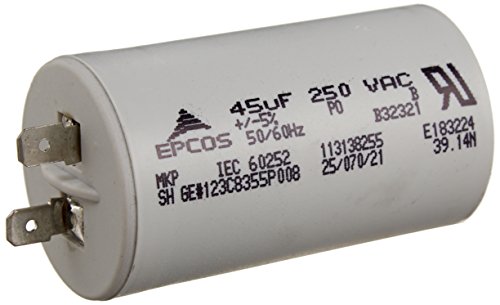
GE WH12X10462 18-carat OEM Capacitor for GE Washing Machines
- The GE Appliances WH12X10462 Capacitor is a genuine OEM (Original Equipment Manufacturer) function designed and engineered to exact specifications
- Replacement GE Appliances Washing Motorcar Capacitor briefly increases the voltage to the motor to help the motor start
- GE Appliances WH12X10462 Washing Machine Capacitor has specifications of 45uF (+/- five%) and 250 VAC
- High quality GE Appliances OEM WH12X10462 Washing Machine Capacitor is manufactured with premium materials for durability and exact fit, be certain to follow instructions in owners manual when installing this part
- Repair your appliance with conviction when you choose Genuine GE Appliances Parts & Accessor
Prices pulled from the Amazon Production Advertising API on:
Product prices and availability are accurate as of the date/time indicated and are field of study to change. Any cost and availability information displayed on [relevant Amazon Site(due south), every bit applicable] at the time of purchase will use to the purchase of this product.

How To Replace Water Inlet Valve On Ge Washing Machine,
Source: https://zimwashingmachines.com/ge-washing-machine-wont-start-problems-solved/
Posted by: greenewheyes.blogspot.com
0 Response to "How To Replace Water Inlet Valve On Ge Washing Machine"
Post a Comment